Editorial - "The Marquetarian", 153, Oxford Road, Dukinfield, Cheshire. April 1953
Dear Members,
The end of this month marks the first year in the life of this Society for it was during May, 1952, that my appeal to all Marquetarians for the formation of such an organisation as ours was published by "POPULAR HANDICRAFTS MAGAZINE". For a Society only one year old, I think that we can be truly proud of our achievements in the cause of preserving and advancing our craft. At the moment our membership stands at 92 with very many more enthusiasts preparing to join us we have in the state of formation three District Groups, namely, LONDON, MANCHESTER and GUILDFORD. We are this month presenting our FIRST NATIONAL EXHIBITION at Guildford and in addition feel sure that you will agree with me when say that the publication of our journal improves with every issue.
When I tell you that one of the largest firms dealing in marquetry supplies by postal distribution is receiving at its peak trade period, over 4,000 orders each DAY for supplies, you will be able to visualise just how many marquetarians there are in practice at the present time. Our membership will undoubtedly increase with time and if the enthusiasm of our future members is as keen as that displayed by our present strength, then we certainly have nothing to fear for the years ahead.
One or two unavoidable errors were made in our first Members' List and in order that all members will have the correct information concerning the location of our complete membership at their disposal, I am issuing a new list with this journal. Members are asked to keep these lists carefully as it’s difficult to issue such information "ad hoc".
Although it will probably be too late when you receive this Journal for entry to the Exhibition, I do hope that all members will have tried to make the show the success it deserves to be. To date I have received over 90 entries. This display should be a wonderful show and all members who possibly can are asked to attend.
Page 2
Please do read the article submitted by London District. Group on their formation and activities. They have set the example to the rest of the country, and it is my sincere hope that many more centres will commence local meetings etc., as soon as possible. The enclosed design has been submitted by A.E.MYERS of Leeds to whom we are most grateful. I would also like to accord the Society's appreciation to NOEL MALYN for his very kind offer of accommodation to members visiting our Exhibition.
Yours sincerely, JACK COX.
P.S.
It is regretted that the large number of members letters received since our last issue of the "MARQUETARIAN' cannot be included in this issue due to the lack of space.
Page 3
"DONKEY WORK or THE BEGINNING OF THE END" by Douglas Walters.
How often have we looked at a piece of finished craftwork and said to ourselves "A pity it's spoilt by the finish." Are we satisfied with our own efforts at finishing?
It does not take years and years of practise to obtain a really fine finish, provided that we can realize and eliminate the reasons for a bad finish, namely:
1. Lack of patience and therefore the rushing of the finishing processes.
2. Inadequate preparation of the surface to be polished.
3. Wrong choice of materials.
Only the culprit himself can eliminate the first cause of a bad finish, and I make no excuses for repeating the trite but true saying "If a job is worth doing it's worth doing well!" It is perhaps natural and understandable that having reached the final stages of a piece of work, we are impatient to see it finished, but this is a tendency which must be curbed if a good finish is to be the result of our labours. Polishing is a job that cannot be rushed in any of it's stages, ample time must be allowed for drying out between applications, and rubbing down between coats, where applicable, must be done with great care and a light hand.
Any polish, when used on a wood surface, will accentuate any defect in that surface, so much so, that what looked a perfect surface before polishing may well appear uneven and pitted afterwards.
Having allowed ample time for the glue to harden completely, the first stage in finishing a Marquetry picture is the preliminary cleaning off of any surplus glue, paper pattern, etc. which may be adhering to the picture. For this, as for all stages in finishing it is essential that the picture is lying on a flat even surface and is capable of being held in a steady position - a right angle of thin dowel .....
Page 4
"DONKEY WORK" (contd)
rod, pinned to the bench around two sides of the picture is ideal. All sanding should be done with the sandpaper wrapped firmly round a suitable sized block, the surface of which is quite flat - a cork block is much the best. For preliminary sanding never use anything coarser than a fine No. 1 grade paper, otherwise scratches will appear which will be hard to eradicate. Try always to work in the general direction of the grain and always in the same direction in all stages of the sanding. Hold the block firmly, being very careful not to 'dub' over the edges.
To facilitate the removal of a paper pattern from the face of a picture, the surface may be moistened slightly with water, but do not overdo it, and also do not allow any rolls of the paper design to rub-up under the sanding block. The preliminary cleaning up having been completed and the picture exposed we now proceed to obtain a flat even surface, by further sanding, using nothing coarser than a No.0 grade paper. This stage taxes quite a little time and your arm no doubt will begin to ache before you have finished, but to use a coarser paper would be to invite trouble in the way of scratch marks. As before, use the block firmly and watch those edges. By this time we should have obtained a perfectly flat even surface, free from blemishes, but before proceeding to the final sanding I would like to mention a tip which will prevent hidden blemishes from appearing during the actual polishing. Take a clean rag and wet it well with Methylated Spirits and rub lightly and quickly all over the picture - any hidden blemishes will now show up for as long as the surface remains wet. These will appear as small black marks. Allow the spirit to dry (a few moments only) and continue sanding with the GRADE No.0 sandpaper a little longer, then use the spirit test again. The Methylated Spirit will not harm the picture at this stage and will not affect future polishing.
We can now continue with the final sanding using only a FLOUR GRADE paper very lightly, until the satin smooth surface is obtained.
Now we must decide on the type of finish we require high gloss eggshell or flat. This is purely a matter of personal choice, but my own preference has always been for an eggshell gloss. I do not propose in this article to do more than list the various types of finishes - there are many excellent books on the market that deal in detail with this and all the methods of polishing; and the serious worker would do well to invest in one of them.
I would like to mention .......
Page 5
"DONKEY WORK" (Contd)
one method of preliminary polishing which I have found to be very successful and easy to do.
The various veneers used in marquetry all have different degrees of porosity and to obtain an even finish it is first necessary to seal the grain of the picture and thus obtain a surface which is perfectly smooth and which will be even in it's absorption of the polish. This may be done by the use of a cellulose "sanding sealer" a proprietary product consisting of a white powder in a cellulose solution. It is quickly and thinly applied to the surface with a clean rag, rubbing well in, allowing it to dry for about half an hour. The picture will then have a shiny surface and this should be lightly sanded with a flour grade paper until all the traces of the gloss have been removed. The surface will now be covered with a fine white powder which can easily be wiped off with a soft cloth. Repeat the procedure and burnish with a cloth and you should have a surface as smooth as glass which can either be waxed or French polished. Note - sanding sealer should not be used when it is intended to oil polish the picture.
The Sanding Sealer has no colouring effect on the picture, it being completely transparent when sanded, it does however bring out the natural beauty on the various grains.
In conclusion, here is a list of finishes which have all been used successfully by marquetry workers.
USE |
FINISH |
METHOD OF APPLICATION |
Normal |
White French Polish |
Brush or Rubber |
|
Bleached Beeswax |
Cloth or stiff brush |
|
Eggshell Varnish |
+ Brush |
|
Raw Linseed Oil |
+ Rag |
|
|
|
Heat and Waterproof |
Cellulose (Gloss |
|
|
or Matt) |
Spray |
|
Rubbing Varnish |
+ Brush |
|
‘Valspar' Clear |
|
|
Lacquer |
+ Brush |
These have a slight darkening effect and are therefore very useful for marquetry work on reproduction furniture or where an antique appearance is desired.
It is useful to remember that gloss finishes give the best degree of protection and they can always be 'softened' by rubbing down lightly with fine pumice powder.
Page 6
"THE CAUL" by M.W.A. Wright.
It is probable that more work is spoiled by bad adhesion than by any other cause. The question of which adhesive to use had been dealt with in a previous issue, but I feel that the beginner is very prone to overlook the importance of that vital appliance the caul.
To understand the caul one must appreciate that glue contracts after setting. The conclusion arising from this fact is that as little glue as possible must remain between the joined surfaces and the quantity must be the same over the whole surface. When applying glue one invariably uses much more than is necessary for efficient adhesion and the most expert application gives an uneven layer. This excess must be removed and the layer 'ironed' out. The only practical way of doing this is by a properly made and used caul. The type described below has been used for a great many years, and is very efficient.
1. The design. Decide on the maximum size which wilI meet your everyday requirements (say 12" x 10" picture size ) Add 1/2" all round to this giving 13" x 11". Obtain 2 boards of this size at least 1/2" thick, and plane until the surfaces are perfectly, true and smooth. Take eight more pieces of wood each 13" long and 1½" x 1" in section. Plane one narrow edge of each to a regular curve from end to end, keeping the face square with sides. A curve of 1/8" in this length should be sufficient , but all must have identical curves. You will now need a piece of felt 13" x 11" x 1/4" and eight 'G' cramps to complete the caul.
2. To use. For cold pressing the caul is, used as follows: Lay four of the curved strips on a bench or table spaced evenly, with the curved sides uppermost. Lay one of the flat boards on top with the grain of the board at right angles to the bearers. Cover with a sheet of
newspaper. Next place the glued backing and picture on the newspaper with the picture uppermost. Cover with another sheet of newspaper, then the felt and the other board in that order. The remaining 4 bearers are then placed on top, curved sides down,, exactly opposite those underneath. Fix the 'G' clamps to the ends of each pair of bearers, starting with the centre ones first and working outwards. Make sure that each pair of clamps is .......
Page 7
"THE CAUL" (Contd)
tightened evenly so that the bearer first exerts pressure at it's centre. The clamps are screwed down until the bearers are so bent that their curved surfaces are in contact with the boards for the whole of their length. The appliance is now set aside for such time as it takes the adhesive used to set, when the clamps may be removed and the picture cleaned and finished. The pressure applied to the picture may be varied by using bearers of different sizes.
3. How it works. The curved bearers are designed to squeeze out surplus glue from the centre to the edges so that only a minimum is left between the backing and the veneers and none is trapped to form blisters or shrinkage points. The felt distributed the pressure evenly over all pieces of veneer irrespective of their thickness and the paper prevents the work from adhering to the appliance. Thus we have a very thick and even layer of adhesive and in fact if carefully done, the result will be very close to ideal.
4. A Temporary Caul. As a temporary expedient an efficient caul can be made from 2 boards and a few clamps. One face of each board is planed round (say ⅛" to ¼" across it's width), the work covered with a layer of paper underneath and a fairy thick pad on top (say six sheets), placed between the boards with the curved faces inwards and clamps applied around the edges until the boards bear, evenly on the work. Very good results can be obtained by this method, but these cauls do not stand up to regular use.
To use with a hot glue, the glue is first applied to the backing and allowed to chill. The felt and top board are made very hot and the whole assembled as at Para 2, whilst the felt and board are hot enough to liquefy the glue.
The Caul is then set aside until the glue chills - at least four hours should be given before removing clamps but the work should not be cleaned up for at least 12 hours, longer if possible.
Page 8
"FORMATlON OF DISTRICT GROUPS" By Noel Malyn.
When the Society was formed in August, 1952, it was the earnest hope of those of us who attended the opening meeting, that eventually our membership would be of sufficient density in various regions to enable us to form District Groups. We had in mind that each group would hold periodical meetings for the purpose of discussing problems and exchanging experiences. This was our dream for the future, a dream which had now been partly realised, for our first group is row meeting regularly. Yes, London District Group under the leader ship of Cliff Penny has been under way for the past two months. As a member of this group I have been instructed to pass on the benefit of our experiences in forming the group.
Firstly, there is the question of contacting other members here your Member's List is invaluable. Examine the list closely and write to those who are within reasonable travelling distance - don't wait for them to write first - they may be shy!! Our group started with a meeting between Cliff Penny and Eric Vickers, then the list of members came out from Headquarters and the original two grew to three then four and last week there were seven with the promise of three more to attend our next meeting.
The next point that arises is, where to hold your meetings. if your homes are reasonably accessible to each other you can alternate on each others homes; otherwise you could meet at a cafe, inn or such We usually meet at a cafe and then continue the session at a Railway Buffet.
Having arranged your meeting you can now get the rewards of your efforts. The first obvious gain must be that of new friendships: secondly, you have the opportunity of sharing ideas and experiences. You will learn that yours is not the only way of making a marquetry picture; the other members might have thought of a way to get over your particular difficulty; and so you will find yourself helping others and at the same time receiving help.
In our group, pictures are handed .......
Page 9
"FORMATION OF DISTRICT GROUPS" (contd)
around for criticisms. No punches are pulled for we fully realise that only by healthy criticism can we hope to advance the craft. Another line followed is that of veneer identification and here we are fortunate, inasmuch as Cliff Penny is an expert in this field and maintains an up to date book of veneer samples to illustrate the variety of timbers. Eventually we hope to have a quiz session on veneer identification.
The frequency of your meetings will depend on the distance your members have to travel; some of this groups members have up to 1½ hours travel each way so we meet fortnightly. You should arrange the frequency of your meetings at your first gathering and then make every endeavour to stick to it. We also suggest that you have a system of notifying attendance which will not leave the bulk of the postage and letter writing to one member. Here in London we have been fortunate in arranging a telephone chain message.
We intend to make it our aim to pass on some useful tip or other each quarter via the "Marquetarian". If a number of similar groups can get going and do a similar thing there should be no shortage of material for your Journal. Remember, that a group can constitute two members or more. The tip for this quarter is quite brief - have you ever considered keeping a 'book' of veneer patterns, if not, then start right away. It can in itself be most fascinating and, of course, very useful. Keep your samples regular, 3" x 3" is suggested as a minimum size so that the features of the veneer show up. Join each piece of veneer to it's neighbour with a piece of tape and the resultant string can be folded up like a concertina. You will find that this method will enable you to spot at a glance the veneer you need for your picture.
In conclusion, should any member living in the London area desire to attend the fortnightly meetings held on a Wednesday night, will they please contact:
London Group Secretary: Cliff Penny,
701, College Gardens,
North Chingford,
LONDON, E.4.
who will be pleased to forward full details as to the meeting place, etc.
Page 10
"MARQUETRY IN CO. DURHAM" By John Bradshaw.
I was in Durham Cathedral just a short time ago and in my tour around this magnificent building I strolled into the Monk's Dormitory. I saw something there which gripped my attention at once Among the curios and antiques were four panels each being a life-size picture of one of Christ's Apostles and each being done in Marquetry. These pictures of the Apostles were amazing, having been executed over a hundred years ago; the bulk of the pictures were in a good state of preservation. The worker who had done this job in those days certainly had a good choice of veneers and materials.
I noticed one point, the shading in the folds of the robes, eyebrows and moustaches etc. were done by scratches and piercings by some very sharp instrument and filled in with a dark filler which when sanded down gave the very shading required. This I think will be well repaid on trial today.
I have noticed too, in the City stores, in some large towns, Marquetry pictures for sale with prices ranging from £3 to £25. To my mind these pictures were of hackneyed design and what I would suggest is that beginners learning the craft also learn to design for themselves. Even if you have no draughtsmanship abilities, there are aids which can be bought for a couple of shillings which would overcome many difficulties. The common pantograph is one, with which a picture could be enlarged many times without trouble or tears and if a ordinary picture postcard of some attractive design which appeals to you be procured, and the instructions with the pantograph carefully followed, then you can have the design for Marquetry which some day may not only win you honours in exhibitions but also cash prizes in addition.
Page 11
(September 2008. Please note: We have carefully checked and rechecked issue 2 to find out where this next article
originated from, and who was the author, but, unfortunately the article was actually printed as displayed below -
so here it is in its genuine original format - a rare historical editorial error we're afraid!)
"YOUR PICTURE" (contd)
Having obtained entrance, the picture construction should lead the observer's eye to the main point of interest and thence follow an easy route, through a group of trees for example to an accent in the sky or to a glimpse of distance. A favourite device for allowing free passage into a picture is an arch, window or doorway in shadow, since the eye is attracted more by light than dark. It quickly passes over the dark tone of the doorway and into the picture where the subject is brightest. This effect of using the foreground as a frame, is almost unfailing in assuring a unity of purpose.
Horizontal lines make for placidity and peace, vertical lines give stability and strength whilst diagonal lines indicate activity and energy but require other lines with them for support. Lines may be suggested by a series of incidents or accents of light my means of which the eye is encouraged to travel in a particular direction e.g. looking down a row of arches and columns, which diminish as they recede - this is a perfect example of your eye travelling along a converging set of lines to something or somewhere. Lines which cross the picture completely tend to take the eye out of the picture and should be avoided as this creates an unrestful feeling. If this must be done, try to introduce another type of line crossing it near the edge, and so avoid the eye wandering out of the picture.
TONE VALUES: The term "values" is most difficult to realise and to a lack of this knowledge is due much of the bad pictures, one sees in different places. If we may imagine a landscape, in the foreground is a group of trees, behind this is a line of smaller trees, and at the back a line of hills. Each of these features should normally show a decreasing intensity or darkness owing to the greater volume of atmosphere which, if we were looking at the actual land, would be between the point of view and the receding objects. This fading of tone is what we most capture in our pictures. Another way is to imagine that we have a very charming landscape, the composition is good and the picture attractive, then we endeavour to brighten up some white cattle, which were quite well placed in the middle distance of the picture, but alas, the brightening only makes the beasts appear to jump out of the middle plane into the foreground this spoiling a very good picture. We should remember in looking at landscape to look at it all. If there is a white cow in the field and one looks at the cow itself, it certainly is very white, but looked at in relation to the surroundings, it is not as bright. It is the colour contrast that makes such an apparent difference in luminosity and many budding artists make the fault of seeing Nature in little pieces and so fail to realize relationships in tone values.
Page 12
YOUR PICTURE (contd)
The values or tones of a picture are the relative steps in gradation between the darkest shadow and the highest light, NOT the light and shade of an object in the picture, but rather the light and shade of that object relative to it's position in the space of the picture. Each plane of fore, middle or background has a certain scale of light and dark to itself and in depicting a landscape, they must not be mixed It is this same technique ,which is so often used in theatrical scenery to-day.
DEPTH: Space has three dimensions: width, length, and depth All graphic arts are essentially a compromise, in that they have only two of these three dimensions, namely, width and length, and therefore that of depth has to be imagined. The illusion that people and things are bodies with a roundness of their own, and one could walk into a pictured street, arriving somewhere and not just at the other side of the baseboard - this is the illusion that has to be artfully created and it is a fact that the more successfully this illusion is presented, the more successful the picture.
Light and Shadow will do a
lot to feign three dimensional modeling of simple shapes like a head, house or chimneystack, a sphere, cube or pyramid. In landscape we want more than just modelling, we want the illusion of space and to do this we shall need perspective and atmosphere Converging lines, diminishing sizes of comparable things, gradual changing of tone - all these will imply space. Roads and rivers bending towards the horizon are fine; they are converging lines. Incoming waves of a wide sea are useful as receding parallels. The same row of arches and columns I mentioned earlier in the section about lines, can again be exemplary as they can also represent diminishing sizes.
Another method is to include a subject of known size such as a tree or a figure it the foreground. This method gives the eye a yardstick and by comparison, the remainder of the subject matter 'r, the different panes should to progressively smaller and lighter in tone value, thus creating an Impression of depth.
Time and space does not I am afraid allow me to go any deeper into the subject, as many volumes have been penned about it, but now for some practical work.
Page 13
"COMMENTS "
Handicrafts of Peterbrough are staging a National Competition which is to take place in London next September. Marquetry is given prominence in this show and prizes to the value of £50, plus a Silver Challenge Cup are being offered by the organisers. Further information will be given in our next issue.
Members visiting our Exhibition are supplied with tickets by the Society for entry to The Odeon Cinema, Guildford. These tickets do not permit entry to the cinema show, but only to the foyer display.
M. Raymond Rodaer of Ostend has informed me that any members wishing to visit his country will receive the most up-to-date information on holidays in Belgium if they will write to him: M. Raymond Rodaer, Rue de Flandre 21, Ostende, Belgium.
Mr. Cliff Penny of North Chingford wants to get in touch with any member who has some knowledge of the publishing business. Write to: 701, College Gardens, North Chingford, London.
Members are asked for their suggestions for the venue and date of our Annual General Meeting. It is obvious that all members will be unable to attend, but any motions wishing to be presented to the general body may be sent to H-Q. and will be published in the Journal, after which postal votes may be forwarded c/o General Secretary for discussion at the meeting. Any such motions should be proposed and seconded by members ONLY.
The judging for our Exhibition is to take place on Saturday 25th April, 1953, at the Odeon Cinema and I shall be present for this. I would like to meet as many of our members as possible and hope that this opportunity will not be missed by any of you who are able to attend on this date. Any local members who can attend the show during the fortnight are asked to write to D. K. Walters regarding the arrangement of a roster whereby a member will be present every evening.
Page 14
"COMMENTS" ( contd )
I hope to commence a series of articles in our next Journal covering the craft of Marquetry completely and the subject of the first article will be Equipment. Any members having ideas or suggestions
concerning Marquetry Equipment are asked to forward same to H.Q. before the last day of June this year.
................
I would like to have the opinion of ALL MEMBERS on the use of DYED VENEERS in Marquetry. This is a sticky point and many varied views are held by marquetarians. We are to attempt to obtain the most
popular view from all members. DON'T FORGET TO GIVE YOUR OPINION.
................
"MY HOBBY" By James Kidd
For many years my hobby was music and I was a member of several prize choirs and quartets.
Then came a blow - an illness which prevented me from taking any further active part. While recuperating I turned to Pictorial Marquetry and found a new tone in light and shade.
My first effort was completed the hard way and the wood I used was planed by hand to one-eighth of an inch thickness. My previous work as a woodworker gave me many opportunities to study the grains and colours of different woods. That first effort at marquetry took me about two years to complete. A little time later a friend of mine gave me an address which solved my veneer difficulty.
In ten years I have completed about 25 pictures and although I have had the opportunity I have not sold one of these. I feel that this has contributed to my enjoyment.
What hobby can be more satisfying than to have completed an original wood picture, entirely from your own design. Harmony in natural colour - a work of art.
Page 15
"MAKING BETTER SKETCH DESIGNS" By R.H. Parkinson.
If you are not very good at drawing, you can make good sketches from your photographs. Choose to begin with a fairly simple subject. Trees are difficult, but perspective, which is the bugbear of beginners is already done for you.
You need a fine mapping pen and a bottle of fixed Indian ink. For your print, half-plate size is convenient, and it should be on matt paper. Go over the principal lines of the photo with ink remembering that it is not necessary to reproduce every line; you can, of course leave out any ugly objects such as telegraph poles etc. Shading can then be done.
When quite finished and absolutely dry, make up ( or get the chemist to make it up for you) the following solution-.
Potassium Iodide: 30 grains
Water: 10 ozs
Iodine: 3 grains
Dissolve in the order given. Soak the print in this solution until the photographic image has completely disappeared - Vie tine will vary. Rinse in cold water and transfer to a solution of Hypo 2 oz. Water 10 ozs. N.B. DO NOT USE ACID HYPO. Any stains due to bleaching will disappear in this bath. Leave in loath (completely immersed) for 15 minutes, wash thoroughly and leave to dry. You now have only the pen and ink drawing. This you can touch up by adding lines where you think necessary or where you have omitted something. You cannot remove the ink, but if you wish to cover any lines use Chinese White.
The design can then be enlarged by the usual square method or pantograph.
Page 16
"TIMBER IDENTIFICATION"
By Cliff Penny.
The following descriptions of various timbers, together with the writer's comments as to their suitability and possibilities for Pictorial Marquetry are set out below with the hope that any information given may be of some guidance to members in the selection of veneers for their chosen subjects. These timbers will be taken alphabetically and a number given in each issue of "The Marquetarian". Several veneers, which are easily recognisable and have obvious uses for Marquetry, have purposely been omitted.
IMBUYA: Brazil. Also known as Imbuia and Brazilian Walnut. The colour of this veneer varies from a yellowish shade of olive to brown and throws off a very spicy smell. Generally speaking it is not unlike Walnut and 's used for furniture making in Brazil.
IROKO: West Africa. A golden brown colour, coarse and inclined to be brittle in cutting with the knife for marquetry uses, but when included in a picture, in polishing gives a pretty effect. It is also known as Nigerian Teak and is strong and durable being used for flooring, stairs and building when in solid form.
KINGWOOD: Brazil. Also known as Violetwood and Violetta. Although the writer has only used this wood once, it would I am sure provoke comment were this wood not mentioned, for this has been for many years a veneer marquetry suppliers have
found very difficult to obtain. The colour of the wood is
striped black, voilet brown and dark violet. It is of a very
fine texture, hard and heavy, but finishes well. Very rare indeed.
LIMBA: West African - Belgium Congo. Also known as Afara although it has several names dependant upon where the timber
is out. A light yellowish gray veneer, very close straight grain, cuts easily but not very interesting.
Page 17
"TIMBER IDENTIFICATION" (contd)
MADRONA: North America. Also known as Cherry Burr. A very useful veneer from a marquetry point of view, pinkish in colour, cuts well, and worth including in your collection.
MAIDU: Malaya. Better known as False Amboyna. A red curly burr very coarse and hard to cut. Not to be confused with the real and true amboyna from Dutch Guinea which is more valuable and golden in colour. However, Maidu can be quite useful for giving the effect of trees and bushes in pictorial marquetry.
MAKORE: West Africa. An excellent veneer, the colour varying from a light to dark cherry red. It has a very close grain, is easy to cut and polishes extremely well When obtainable with a reddish block figure can be useful for giving a tiled effect on a roof for marquetry purposes. This is one of my favourite veneers and can
be very beautiful.
MAHOGANY: I am not going to attempt to describe mahogany,
it being most difficult and I feel sure that I am not
competent to do so. There are so many varieties of this wood known by various names dependant upon their feature but perhaps the best known are the following: African Mahogany, Stripey Sapele Mahogany, Pemmele, Figured Sapele, Honduras (a paler wood than the African)
Finally of course the best Mahogany of all, the Cuban, which is rather difficult to obtain and I believe is
the most expensive. Ail these types have their uses in Marquetry and if used as a border or surround tend to swarm up' the picture.
Page 18
"VENEER FOR PlCTORIAL MARQUETRY" By A. Addington.
Pictorial Marquetry has been described as something like building a jig-saw puzzle. Of course, this is not quite right, it is something rather more than putting pieces together. One would not say that making a beautiful cabinet is something like making a packing case.
A marquetry picture is made from rare and beautiful woods, the colouring and grain characteristics of each kind of wood being used 'r obtaining artistic effects, and in preparing to make a picture. it is necessary first of all to have a collection of suitable veneers, such as. Maple, Ash, Myrtle, especially the Maple and Elm Burr; The finely figured mahoganys, Silky Oak, Cedar, Cherry, Amboyre, Lacewood, GREYW00D, Zebrano, Tulip, Brown Oak, English Walnut, and many other woods.
Veneer with as many colours in as possible, such as the curl round a knot, or veneer from the butt end of the tree with wild and twisting grain should be used. Plain straight grained veneer does not give life to a picture. You do not see the beauty of the wood when small straight grained pieces of veneers are put together just to give shape and colour, pieces of coloured paper would do that.
Providing the inlays are placed correctly, the changing colour and grain makes the shading or shadows, it is better to select a piece of Veneer to give two or more features of the picture if possible, to make the colour merge into each other, instead of the shading or shadows being sharply cut off.
Incidentally, I have seen very large veneers peeled from logs with the grain and colouring making an almost perfect landscape picture. Of course this is not marquetry; but it does show how the veneer to be used must have a grain with plenty of movement and colour in it.
True artistry is called for in the arrangement of the grain, the blending and contrasting of colours. Colours may suggest sunlight or shadow and the infinite variety of colourings, marking, and veinings should be used to the best advantage to give perspective to the picture.
Nature herself has provided a variety of colours and grain in wood that are vital and alive, which if used the right way will make beautiful marquetry pictures.
Page 19
"DO'S AND DON'TS" By Cliff Penny
Do finish your picture thoroughly - how many people just consider the face only, in fact top show; a good craft will pay almost as much attention to the back as to the face, a good bit of backing is welt worth while in case a prospective buyer turns the picture over for inspection. Recently in a well known store, I was asked to examine same marquetry pictures on show, and discovered that brown paper had been pasted on the back, apart from the fact that the strength of the completed picture is not balanced and will warp in time, the face veneer i.e the picture itself will pull to such an extent as to twist the whole thing therefore, you must have a veneer backing to balance the face.
DON'T use paper or cardboard, it's me use and in any two completely spoils a good picture lowering your standard as a craftsman.
DO use a scraper to clean up your picture. Many people may say that owing to the varying ways of the grain and the quantity of pieces involved, that it is impossible - this is not so. If you know how to sharpen your scraper up correctly, you should have no trouble whatsoever if you use common sense as well as extra patience (and anyone who is interested enough to cut out marquetry pictures must have patience). Do not use excessive pressure when scraping but rather take it in easy stages until you are confident of your ability and you will find that you have a perfect surface to finish with a fine grade sand paper, with the final use of flour paper. How many pictures have been left in a poor state because that added attention, which !s so necessary to this finish of a picture, is passed over in haste. When one's fingers are run ever the surface of a hastily fin'-shed picture, one gets the feel of a piece of corrugated paper and this is probably due to one or other of the following reasons:- Impatience to see the picture polished. The lacking bit of craftsmanship which is so important to the 100% article.
DON'T use coarse sandpaper, it cuts deep into the veneer, and remember that care and attention to the sandpapering is most essential and important.
Page 20
"DO'S AND DON'TS" (Contd)
DO you examine your picture after laying for blisters? These are sometimes difficult to notice by the eye and it is therefore worth
your while to test the whole face of the picture by tapping with your fingertip. You will soon know if you are unfortunate for the faulty piece of veneer will give a hollow sound and can be confirmed by pressure as it will move slightly it is much better to be sure before polishing than to find out later when the picture is on show and someone comments on the defect. After all they are easily laid, especially is Scotch glue is used by prising the piece of veneer with a knife and inserting some hot glue. Work out the excess glue, lay a piece of brown paper on top followed by a piece of ply or wood to protect the picture and also to aid the pressure over the area concerned, apply thumbscrew if possible with not too much pressure or otherwise place some weighty objects over the blister area and leave for not less than an hour. Then remove weights etc. and finish off. DON'T leave blisters because it is too much trouble to rectify them or because you don't feel capable of dealing with them. At a recent exhibition of marquetry in London I saw a picture "The Shambles", York, and without being unkind in any sense, it was indeed a 'shambles'. It was completely covered with blisters and with being highly polished, these defects were made to stand out even more - remember, no shambles!!!
DO you satisfy yourself that each piece you cut for your picture is perfectly cut and of your best? Don't say "That's good enough" if you know inwardly that it's a poor joint and do not rely on stopping or glue to cover your faulty cutting. It is only by giving your absolute best that you can achieve the satisfaction of creating something you can really feel proud of. If you attempt to cover up your mistakes and poor craftmanship; you may succeed in camouflaging it well enough to deceive others, but in your own mind you will always know that it is a second-rate effort. You cannot kid yourself!!!
DO accept criticism from all sources, perhaps my best critics are my wife and two boys who help me immensely by their sound and sometimes severe opinions. DON'T be offended by genuine constructive criticism, it's good for you if you can take it.
DON'T imagine that your last picture was by far the best you have accomplished, it very probably isn't and always remember DO TRY TO DO BETTER next time.
Page 21
"YOUR 'PICTURE' TO BE OR NOT TO BE!" By R.H.Parkinson.
Before becoming completely enthralled by the delights of marquetry, I devoted a great deal of my time to Pictorial Photography At the Judges summing-up after the Annual Exhibition of our Photographic Society, I received a compliment for the 100% perfection of quality of my print. This praise was very short lived however, as the judge then proceeded to tear my photograph to pieces because pictorially it had not been correct. He then constructively outlined how, with better composition, tones and lines etc., I could have obtained a really good picture. This shows that even though your workmanship may be almost perfect your picture can still be terribly wrong.
My face had been very red, but I never forgot this lesson and still thank that Judge for putting me on the right lines.
To assist beginners, and it is to beginners that I offer these hints in the hopes that they will help them to overcome the danger of °red faces' when they are creating a marquetry picture, for the same rules apply to all 'pictures', whether Photographic, Oil or Wood.
Graphic art conveys it's message in terms of form and tone. Art does not hold itself to analysis, but it does not follow that no guidance can be given. From careful study of the works of great artists it is possible to arrive at certain principles of arrangement and composition which will ensure what may be termed °a safe structure for a picture'. REMEMBER - these are not hard and fast rules, as every individual picture demands it's own particular treatment of composition and tones to meet the creators own desired effect.
The first rule to be remembered is that SIMPLICITY pays in some ways the very perfection of draughtsmanship is a fee to picture making, as a super abundance of fine detail may distract the eye and mind from the main object of the picture.
UPRIGHT, OBLONG OR SQUARE. Some subjects immediately suggest the shape of the picture, a person, tower, trees and similar tall subjects will generally demand a upright picture; a group of people, animals, or a
landscape will suggest the oblong shape. In the case of a landscape we have to decide whether we want to convey the broadness of the countryside or a distant effect. In the first case we choose an oblong; in the second an upright to give the desired effect. Again if we desire a combination
of the two, a square picture should prove satisfactorily.
Page 22
"YOUR PICTURE" (contd)
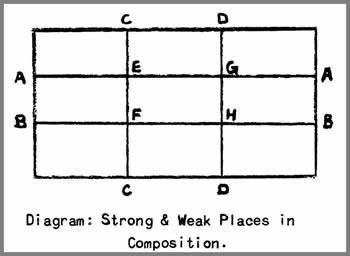
COMPOSITION is broadly - discipline in the arrangement of the subject matter within the picture. It is not the amount of interesting items one can show, but the orderly arrangement of a few important ones. Never divide the picture in two approximately equal parts by a definite vertical or horizontal line. In landscapes containing the horizon, the latter should be one-third of the distance from the top or bottom of the picture. Keep the margin and corners of the picture free from subjects of interest, have a leading object of interest, and place it somewhere on the lines AA. BB. CC. or DD. ( as shown in the diagram) but never in the centre of the picture. The points E,F,G and H, are strong places in the picture where as A E object obtains emphasis; avoid symmetry, e.g. the placing of leading objects at points H. and F. In street and other scenes, the V-shaped area of sky is often unleasing, so do
try to break up the sky line
with some projecting object such as a chimney or tower.
The eye normally moves across a picture from the main point of interest through the centre until it finds a correlated secondary interest on the other side.
Animals, boats. or moving subjects should be at the opposite side to that which they are moving towards, so that they appear to be moving into the centre of the picture and not out of it.
A picture must not appear incomplete or to have some part of it's content excluded, or the picture will leave a question in the viewer's mind. For example, foliage entering the picture from the top with no visible means of support, or a picture which shows a cast shadow but not the object casting it, carries with it a feeling of incompleteness and uncertainty.
LINES: The lines provided by a track or stream offer a very good entrance into a picture, though the same effect may be obtained by leaving the foreground free from obstruction, so that the eye passes right into the picture immediately.
Page 23
"YOUR PICTURE" (contd)
You will require several picture designs (some of the commercial designs are good for this) and two large "L" shaped pieces of cardboard. Now, whilst sitting comfortably at a table or before the fire, study each design in it's entirety and see if you can find any faults or any good strong points, bearing in mind the picture composition details outlined in this article. Take up the two "L" pieces of cardboard and lay them on the design as a frame, and moving it about all over the picture, try to find the amount of subject matter which looks more restful and has the better composition etc. Make a careful note of what you decide, then at some time later go over them again to see if you are still satisfied with the parts chosen.
This practise carried on at reasonable intervals will gradually build up your realization of what is pictorial, and if you do find any improvements that can be made to any design, then some progress has been made. Your efforts have been worthwhile and my time spent preparing these notes has not been in vain.
..................
SALE OR EXCHANGE:
An ELECTRIC FRET MACHINE: Purchased new November, 1952, Price asked £7.10.0d. Write: A. Minshall, 2535, Buxton Rd, Great Moor, Stockport, Cheshire. (restricted to members only, who must state their membership number when applying).
VENEERS FOR SALE: Bundles of mixed offcuts 0 5/-d: 7/6d10/-d; 15/-d: 20/-d: plus postage.
Each leaf identified if requested. If desired settlement can be made AFTER receipt of parcel, if not satisfactory, members can return parcel "no sale". C.PENNY, 701, College Gardens, North Chingford, London, E.4.
STRAIGHT GRAINED MOUNT VENEERS FOR SALE: Ideally suitable for mounts, surrounds etc. for pictures, firescreens, tabletops, etc., ENGLISH OAK - DARK AUSTRALIAN WALNUT: 5/-d: 7/6d: 10/-d; and 20/-d: Parcels - Postage Extra - 1/-d. and 2/-d. Send cash with order to: T.L. HAWKES, 153, Pridmouth Road, Withington, Manchester 20.
Page 24

Note: For those who would like to have a go at this crossword,
here is a clearer reproduction of the clues to the photocopied
original shown above.
| |
ACROSS
|
|
2 |
Floral Wood ? |
(5) |
4 |
Little more than a fabric |
(6) |
7 |
One of a comedy pair |
(6) |
8 |
Cereal |
(3) |
10 |
Diving bird |
(3) |
11 |
Knots |
(5) |
13 |
"Tram Query" (anag.) |
(9) |
15 |
System of magical rites |
(3) |
17 |
Sounds heavy but it is guided |
(3) |
18 |
Age |
(3) |
19 |
Anger from fire |
(3) |
20 |
Sarcasm to be found in the hair on your chest |
(5) |
22 |
Membranous bag in an animal or vegetable organism |
(3) |
24 |
Obtain |
(3) |
26 |
"Cry havoc and let slip the dogs of --- " (Julius Caesar) |
(3) |
28 |
Reverential fear |
(3) |
29 |
See 14 down |
|
30 |
A learned herb |
(4) |
|
| |
DOWN
|
|
1 |
Fire residue |
(3) |
2 |
Pretence |
(6) |
3 |
English Hearts |
(3) |
5 |
Mainly beverage |
(4) |
6 |
Girlish wood |
(6) |
7 |
Behead a forgetful tradesman |
(6) |
8 |
French street |
(3) |
9 |
"To - is but human" |
(3) |
11 |
Alternatively African Rosewood |
(7) |
12 |
Mixed Y.M.C.A. in a wound |
(8) |
14 |
and } |
A nutty wood this |
across} |
|
(7) |
29 |
(6) |
15 |
Another girlish wood |
(5) |
16 |
The 15th March |
(4) |
21 |
Trees that sound like an ungrammatical plural
|
(4) |
23 |
Tool |
(3) |
25 |
Perhaps a rather grey old Earl |
(3) |
27 |
Initially a national game |
(2) |
|
We will bring you the correct answers to the crossword with our October update,
although, surprisingly the answers were never included in subsequent
editions of the Marquetarian!
Page 25
(If you scroll down a little lower, a correctly completed crossword will now appear)
Congratulations to you if you got it right first go! Well done.
Return to News Page | Return to Marquetarian Page | Return to issue 1 | Go to issue 3 | Go to issue 4
|