Marquetry's main
Implement

Ultimate
sharpening
methods


THE MARQUETRY CUTTING KNIFE

GETTING TO THE POINT

We always suggest that you start by cutting shapes. Carefully check your test pieces for any major faults in order to correct your technique for your project work.

 - If the pieces are a very loose fit with significant gaps all round, check that you kept the knife in close contact with the template during marking and then follow that same knife mark during the subsequent cutting out.

- If the edges of the cut are chamfered (sloping) check how you hold the knife. Many people hold the knife as they would a pen, in a sloping position. You must learn to roll the wrist over to keep the knife blade square to the work to produce a square cut.

- If you are cutting small pieces, or tapered ends, reinforcing the veneer first with paper tape will help. Although the wood may still break up, the tape will hold the veneer together - careful handling will keep it together until it can be fitted and glued into final position. Do not remove the reinforcing tape until the glue has dried (15 minutes) or it will all fall apart!

 - If you are finding it hard to see where you have traced the line through the window, a coat of paper tape makes the cutting line much more visible.

 - If the wood appears to split easily, make sure that you do not use too much pressure on the knife to try to cut too quickly. This severs the wood along the fibres instead of cutting through them. It is better to use several controlled strokes with lower pressure on the blade.

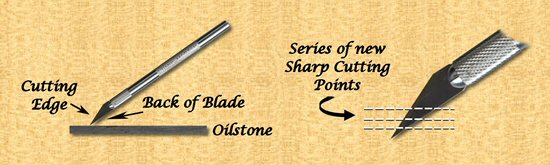
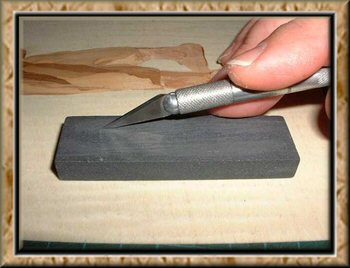
Of all the skills required in marquetry without doubt, the main one is the ability to cut accurately. This skill depends on maintaining a sharp point on the knife.

The point of the blade is the part of the knife which is used to cut not the long edge of the blade.

To maintain this point the blade is sharpened on fine carborundum stone or oilstone, as shown below (Fig. 1).
The back of the blade is applied to the stone and rubbed in a straight line to remove any burrs or hooks on the tip.  This will progressively move the cutting tip down the blade. NEVER try to sharpen the bevelled cutting edge, you will not be able to compete with the manufacturer! Work evenly over the surface of your carborundum stone and try not to wear a groove in it. A cheaper alternative is to use medium cloth backed carborundum sheet.
End of rolls from an engineering works can be scrounged!

Grinding the blunt point of the blade back to a new point
(Fig. 1)


Photo: The blade being ground back on an oil stone


In order to make a finer cut and allow the blade to be removed easily from the wood, the shoulder between the cutting edge and the back of the blade is also ground down giving a more streamlined effect.

Return to top of page | Return to "How's it Done?" menu page

Go to Home Page
Go to the Clubs and Groups directory page
Go to the International Galleries directory page
Go to the Marquetry Society official messages page
Go to the National Exhibition Winners Gallery page
Go to the Millennium Mural exhibition page