|
 |
|
![]()
HANGING THE PICTURE
This section is not about your release from the frustrations of Marquetry but about display. Your picture is finished. Where do you put it? With all the effort you have put into it its going to be well worth hanging it in a place of prominence for all to admire. We should warn you at this stage that if you decide to continue, and we would certainly like you to, you should clear your lounge walls because you will soon be able to have your own picture gallery. In order to hang your picture securely, we use a method which looks frightening when carried out but is a neat inexpensive way of sorting out the problem. The method is as follows:
|
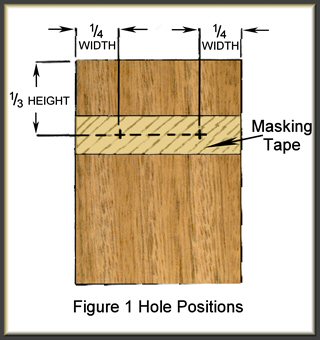 |
Mark two points, equidistant about the centre line, approximately ¼ the width in from each side. Drill holes at these points using a five millimetre drill to a depth less than the overall depth of the picture. Measure against the drill and wrap a piece of masking tape round the drill to ensure the right depth (Figure 2). If someone else does this the first time your heart will be in your mouth expecting the drill to appear through the front of the picture. |
 |
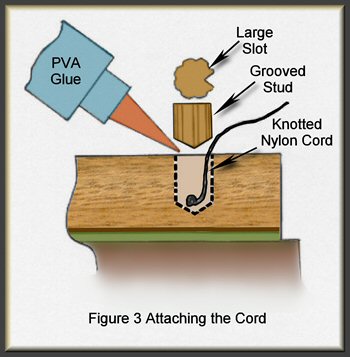
Clear the dust from the hole, and remove the tape. Obtain a length of thin nylon cord and knot one end. Cut off a length of cord to suit your hanging requirement and knot the other end. Prepare a notched stud to fit the hole by cutting to length. (Just less than the depth of the hole). Insert a knotted end of the cord into one of the holes. Pour a small amount of PVA on top of it, then insert the stud and press firmly down ensuring that the string comes out of the notch which should be pointing towards the top of the picture (Figure 3). |
 |
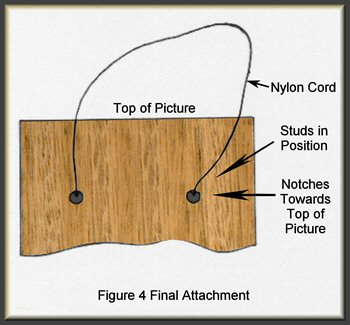 |
Repeat for the other hole (Figure 4). Allow to dry and then trim stud until flat. (Don't cut through the cord!!!!!!) |