|
 |
|
![]()
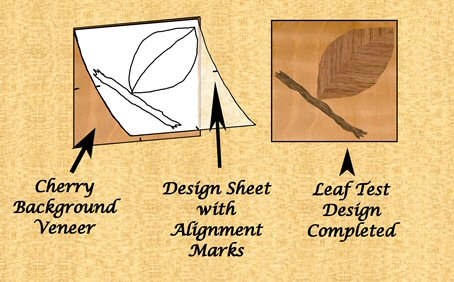
VENEER CUTTING - MAKING A TEST PIECE
The window method is a simple technique, but as you may not have used the particular skills required for marquetry, we suggest you start with a test piece with which you can experiment. The test piece comprises a simple leaf design with two pieces of veneer - one striped (leaf), one plain (background) known as the ‘waster’. The stages to complete are: |
|
 |
|
1. Tape the design to the top edge of the plain veneer. Using black carbon paper and pencil draw the details onto the veneer and make marks on both to ensure alignment as the design is raised and lowered. The side with the traced design is often considered to be the working side (mucky side). The other side (clean side) is then the finished picture, but this isn't actually a "hard and fast" rule. You can, if you prefer, work from the 'mucky side' but your drawback will be a little more cleaning up required when you get to the finishing stages of your picture. But don't worry about that aspect too much because many award winning marquetarians do work that way and they consider that approach to the work gives a better view of the finished picture - and a little more cleaning up is definitely worth that effort. 2. Cut away half the leaf shape leaving a hole "at the top left portion of the leaf" in the veneer. NOTE: We strongly recommend that if you are right-handed you should always cut down the left-hand edge of your shape. Turning the shape to keep the line to be cut on the left at all times. The reverse may apply to left-handed people. An exception to this rule is when cutting a fine point such as at the tip and the base of the leaf. A small cut should be made away from that point along the cutting line to prevent cutting into the background veneer. 3. Place the striped veneer behind the hole and position the grain direction according to the arrows to get the ‘leaf’ effect. Temporarily tape in to position with masking tape to avoid movement during marking and cutting. 4. Firstly, mark the shape of the hole accurately on the surface of the striped veneer running the point of the knife carefully around the edge of the hole and using it as a template. Do not attempt to cut through the veneer but repeat the operation to ensure complete marking. Now separate the veneers and check the marked shape for any areas where there may be a tendency for the veneer to split as you complete the cut. The top corner of the leaf is a good example where the tip may well break away due to cross-grain. To avoid this simply stick paper veneer tape on the back, over that part of the veneer and cut through the veneer and the tape together so that the tape reinforces the wood. This will either avoid splitting or at least hold the pieces together if they crack. 5. Press the cut out shape into the hole in the plain veneer from the clean side. If the shape has been cut accurately it should hold fairly tightly in position without the need for tape. Finally squeeze a small quantity of the white PVA type glue into the joint on the working side of the picture, rubbing it in gently with the finger, finally pressing it firmly home with a rubbing stick. The veneer shape will thus have been stuck back into the picture edge to edge with the excess of the glue rubbed away. When the glue has set (a couple of minutes is usually enough), repeat steps 2 to 5 for shape "lower right portion of the leaf" to complete the leaf. 6. When cutting long gently curving or straight lines the cutting can be done in a continuous sweep. With hard veneers and/or sharper curves it is better practice to break this down into a series of shorter movements with pauses giving better directional control but still producing a smooth line. When cutting small and complex shapes such as the ends of the twig, the technique is taken to the ultimate and the shape is cut out by pricking with the sharp point of the blade, holding the knife almost vertically. With each stroke the knife point is pressed through the veneer, withdrawn, moved ½ - 1mm along the line and pressed through again, thus a continuous cut is produced from a series of overlapping small cuts. It will be necessary to repeat the whole process to ensure that all the fibres are severed. It is good practice to cover the back of the area to be cut with tape to control cracking, produce a sharp square edge to the shape, and to retain all the small detail. Complete the motif with the twig shape cut and glued in position. You have now made your first simple marquetry picture. Carefully check your test piece for any major faults in order to correct your technique for your first real picture.
|